1 The (anti-)framework
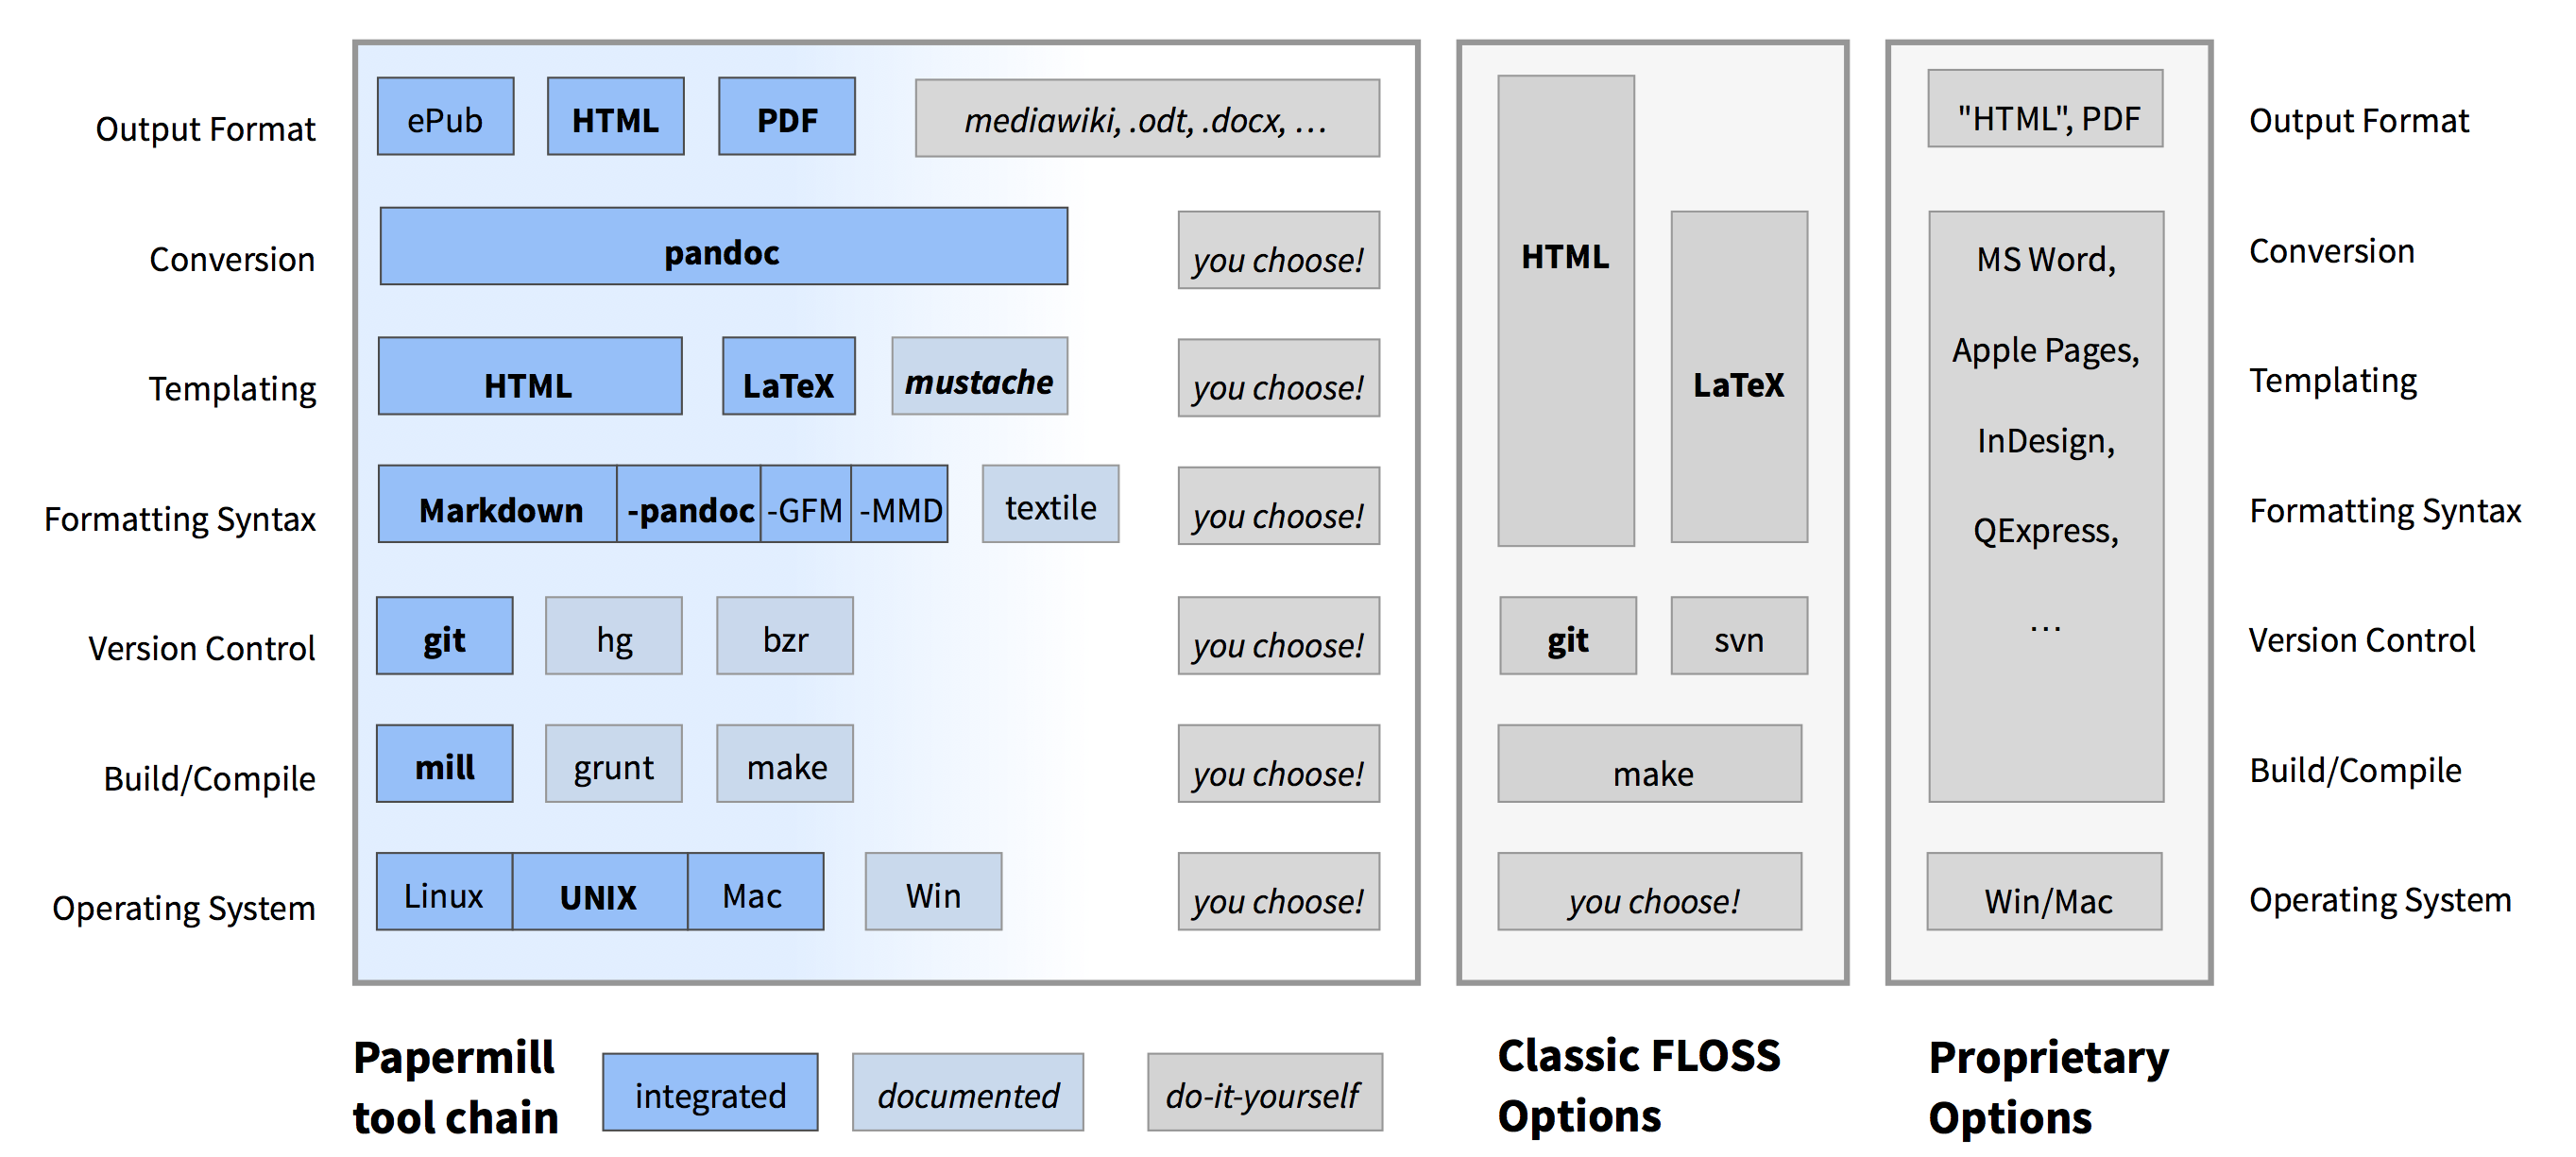
papermill ‘software stack’ in comparisonpapermill aims to be a modular, decoupled framework.
In software, a ‘framework’ is an abstraction which solves a general problem in a reusable way.
A ‘modular’ framework consists itself of components which are also useful by themselves (and could already be existing), along with additional ‘glue’ software to better integrate them.
Being ‘decoupled’ means that the framework should still be useful if a user uses only some of its components, and that it should be relatively easy to change them for different ones.
For example, someone already writing in TeX does not have to use the Markdown syntax and still can take advantage of the configuration and automation, although e.g. the web output might not work as expected.
1.1 A quick Walkthrough
This Manual should explain all the steps necessary to produce a publication with papermill.
It covers the following steps:
SETUP: start your project
- Manually or from template (“Stationery”)
- Get to know the project (folder) structure
INPUT: write content
- Text: Markdown /
pandoc - Assets: images, figures, bibliography
- Text: Markdown /
OUTPUT: output your content
- Web ->
HTML - Print ->
LaTeX
- Web ->
2 Setup
“SIE HABEN RECHT - UNSER SCHREIBZEUG ARBEITET MIT AN UNSEREN GEDANKEN”1
— Friedrich Nietzsche writing on an early typewriter, 1882 [1], quoted after [2, p. 304]
2.1 Project
papermill is, at its core, a formalized project structure and configuration.
You can start your own project from a Stationery – pre-configured templates that include everything mentioned here. There are several types to choose from, like ‘Simple’ (most basic) and ‘Paper’ (for scientific work).
The basic rules are very simple:
- every ‘project’ has its own folder
- there is one ‘configuration’ file
- there is at least one ‘document’, in the folder and the configuration
    Project/
    ├── document.md
    └── papermill.json
        └─> { "input": "document.md" }
2.2 Document
‘Documents’ contain the textual content of your project.
They are plain text files, formatted in Markdown.2
For more flexibility while writing, a document can also be its own folder. All Markdown-files in it will be combined into one single document, in alphabetical order.
Practically, this means that you can just start writing new chapters whenever you want, and take care about their order later on, just by renaming the files.
A good idea is to simply use a “number-*” prefix.
    Project/
    ├── Text/
    │   ├── 1-intro.md
    │   ├── 2-a-chapter.md
    │   └── 3-another-chapter.md
    └── papermill.json
        └─> { "input": "Text" }
While writing, any other files or folders in the project directory will not be considered as input.
For example, unfinished chapters could be stored in a Drafts/ folder.
    Project/
    ├── Drafts/
    │   └── an-unfinished-chapter.md
    ├── Text/
    │   ├── 1-intro.md
    │   ├── 2-a-chapter.md
    │   └── 3-another-chapter.md
    └── papermill.json
        └── > { "input": [ "Text" ] }
A project can also have more than one document as input.
This can for example be used to produce different parts of a dissertation which should be printed separately.
Their content should be related, otherwise they would be two different projects.
The following configuration would also produce a separate output from the Drafts/ folder in order to preview it:
    Project/
    ├── Drafts/
    ├── Text/
    └── papermill.json
        └── > { "input": [ "Text", "Drafts" ] }
Important: Any further sub-folders inside an ‘input’ folder should be avoided.
Files in them will not be combined, but it is generally not a good idea to move source files between different ‘depths’ of folders if there are images in them (see the chapter on Assets).
In the above example, moving the unfinished chapter to the Text/ folder would not cause any problems because they both have the same ‘depth’.
2.3 Configuration
The configuration file is the second most important part of any project.
It contains all the information about the project needed to produce ‘output’.
It is also a text file, but encoded in JSON, “a lightweight data interchange format. […] It is readable by humans and machines [and] easy to use.” [3, p. 136]
In general, the configuration lists the following items:
- Meta-data about the publication
- Input: One or more document’s sources
- Output: How to output the ‘input’ for web and print.
A simple example looks like this:
    {
      "input": "doc.md",
      "output": {
          "web": false,
          "documentclass": "article"
      }
    }
Again, it is recommended that you choose a papermill Stationery to start of your project, as it comes with a matching configuration file.
The detailed description of the configuration file is available in the Chapter mill, Section papermill.json.
2.4 Text editor
As we already have established3, we don’t want to use a word processor because we are working with plain text.
Generally, we can distinguish between different kinds of text editors:
- the very minimalistic editors, with limited functionality, like the ones that ship with an operating system (like Windows’
Notepad.exeor Apple’sTextEdit.app). IDEs, integrated development environments
Of course, there also exists every gradation in between those two.
Some of these editors already have some support for Markdown. They ‘understand’ the basic syntax of the formatting language, which enables them to offer features known from programming languages:
Syntax highlighting: Making the plain text source more readable by using colors, font sizes, etc. to visualize the relation of syntax and text. Also helps to spot errors in the syntax more quickly (and, after getting used to it, almost intuitively)
Shortcuts: Offer quicker way to type the syntax. Although with Markdown the syntax is as minimal as possible, they still can be of great help.
Recommendations:
TextMate(Mac, ‘open source’)SublimeText(Mac, Windows, Linux; not ‘open source’ but friendly)
These both have the ability to be extended with ‘bundles’, and already ship with a ‘Markdown bundle’ built-in.
(Like other text editors that have support for Markdown, they only know about the basic syntax, so some extension to it will not be properly highlighted.)
2.5 git
See the Versioning chapter in the Introduction for an overview of the concepts and terms that you should know when working with git.
It is generally not recommended to track ‘generated content’ with git, if that content is generated from sources that are already tracked. Not only does it needlessly increase the size of the repository, it is also a source of confusion since all merge conflicts have to be solved two times, once for the source and again for the result.
git can ignore files that should not be tracked, for this or any other reason. This is configured in a hidden file named ‘.gitignore’. Again, when using a papermill Stationery, this is already taken care of.
2.5.1 Automatic committing
If you don’t want to commit manually, there are two software tools that can generate a commit message with as much info as you want and can get out of the computer you are working on.
Both can also be set up to work in the background. This is very useful for novel users, since they don’t have to interact with the version control system at all. It could also be used by advanced users who want to send a steady ‘stream’ of their work into their own ‘live’ branch, integrating a sum of those later on.
Installation and usage instructions are available at the project’s own sites.
flashbake– commissioned by Cory Doctorow and written by Thomas Gideon.- User friendly, written in the
pythonprogramming language - Extendable with (
python) plugins - Runs on
Linux(well) andMac OS X(manual work needed)
- User friendly, written in the
git-o-mat– inspired byflashbake, and yet anotherpapermillprototype- Very simple, written as a
shellscript - Extendable with your own scripts (for message generation)
- Runs well on
LinuxandMac OS X
- Very simple, written as a
2.5.2 Hooks
git can help with managing some automation by using hooks to run commands when git does certain actions, for example committing.
Hooks are small (executable) scripts that reside inside a git repository, under .git/hook/$action, where $action is a known hook.
In the the context of papermill, there are two particularly useful hooks:
- post-commit
can be used to run a command after every commit.
Example: a
.git/hooks/post-commitcompiling the output#!/bin/sh mill output .- pre-commit
as the name implies, this script is run before every commit. Furthermore, if it returns an error, committing is aborted!
Using the
post-commitexample as apre-commithook would ensure that no data can be committed that would not build an output (but also adds a considerable delay before the commit happens).
3 Input
3.1 Document Structure
A very generic structure. Not all publications use all of the elements.
- Titleblock/-page
- Title
- Author
- Date
- Front Matter
- Table of Contents
- Imprint
- Abstract
- etc.
- Document Content
- Chapters
- Sections, Subsections
- Text
- Sections, Subsections
- Chapters
- Appendix
- Bibliography
- List of images/figures
- Colophon
- Acknowledgments
- Affidavit
The most important of those can already be expressed with syntax, for example the titleblock (for which the supplied meta-data is used). Headings of different levels divide the document into chapters, sections etc; and a ‘Table of Contents’ is generated automatically from this organization.
Similarly, if citations are marked correctly, a list of references is inserted at the end of the document.
Sources and further reading: [4, p. 13], [5]
3.2 Markdown
“The typewriter will alienate the hand of the man of letters from the pen only when the precision of typographic forms has directly entered the conception of his books.
One might suppose that new systems with more variable typefaces would then be needed. They will replace the pliancy of the hand with the innervation of commanding fingers.” — Walter Benjamin [6, L. 12–13]
The Markdown syntax aims to be easy to learn, type and read for humans. Most of the text is simply plain text, but any kind of formatting is also entered as text, using various symbols. Many of them should seem familiar from the conventions used in plain text emails.
The following is based on John Gruber’s original “Markdown: Basics” [7] and John MacFarlane’s “Pandoc User’s Guide” [8].
Note: Some things can be written in more than one way in Markdown. To be more concise, only a carefully chosen subset of the allowed syntax is described.
3.2.1 Text Formatting
The basic text formatting syntax works with words and phrases.
Note: Every description has short example, which is followed by how it would output in this document (preceded by an “=>”).
3.2.1.1 Emphasis
To emphasize a phrase, put * (asterisk) symbols directly around it
this *word* is important=> this word is important
3.2.1.2 Strong Emphasis
To strongly emphasize a phrase, put 2 * (asterisk) symbols directly around it
this **word** is more important=> this word is more important
3.2.1.3 Strikeout
To strike a phrase out, put 2 ~ (tilde) characters before and after it
this ~~word~~ is striked out=> this word is striked out
3.2.1.4 Subscript, Superscript
- to put a phrase into superscript, put a
^(caret) character before and after it - for subscript, use the
~(tilde) character
H~2~O is a liquid. 2^10^ is 1024.=> H2O is a liquid. 210 is 1024.
3.2.1.5 Verbatim
To set a verbatim phrase, for example short example code or names of programs, put a ` (backtick) character directly around it (two of them if the enclosed text itself contains a backtick).
`less` is more=> less is more
Inside a verbatim phrase, no other syntax is interpreted!
This is especially important when something needs to be written that could also be interpreted as Markdown, HTML or LaTeX:
Bad:
In HTML, there is a <blink> tag.=> In HTML, there is a tag.
Good:
In `HTML`, there is a `<blink>` tag.=> In HTML, there is a <blink> tag.
3.2.1.6 Nesting Text Formatting
Nesting of most test formatting is easily possible, but may show unexpected results in certain cases.
Special care should be given to spaces: there should be none between a formatting character and the enclosing text.
Furthermore, since no Markdown is interpreted inside a ‘verbatim’ text, there is no possibility to emphasize parts of it.
A good strategy to deal with both cases is to break down the the phrases into smaller components.
**`H`**`yper` ***`T`****`ext`* **`T`**`ransfer ` **`P`**`rotocoll`=> Hyper Text Transfer Protocoll
3.2.2 Document Structure Elements
Also called ‘block elements’, because they form their own ‘block’ of content. They have to be preceded and followed by a blank line, so that they are set apart from the rest of the text. This also increases the clarity of the source, especially because block elements can be nested (see “nesting elements”).
Note: There are examples for every block element. For the most important of them, example output for print (using a default LaTeX template) and web (using the ‘bookstrap’ template). Naturally, there are small differences between the original web output and how it is reproduced in print (background colors, for example).
3.2.2.1 Paragraph
A paragraph is any text, followed by a blank line (because it is a ‘block element’).
All line breaks inside a paragraph are ignored!
This is a paragraph.

This is the next paragraph.
How Markdown handles paragraphs and line breaks might be the most alienating thing about it. It takes some getting used to, but increases flexibility while writing because line breaks can be inserted to break long lines in the source, without effecting the output.
This is all
just one
paragraph.

This is the next paragraph.
Conversely, this doesn’t work for specific kinds of text, where line breaks are important.
To force a line break, end the line with a \ (backslash) character. For example, this poem:
Roses are red, \
Violets are blue, \
Sugar is sweet, \
And so are you.
3.2.2.2 Heading
A heading is created by a line starting with one or more # (hash) characters. The number of hashes denotes the heading’s level.
# Top-Level Heading

Some text.

## Second-Level Heading

More text, where I write about hashtags. For example,
#OccupyWallStreet is just text, NOT a heading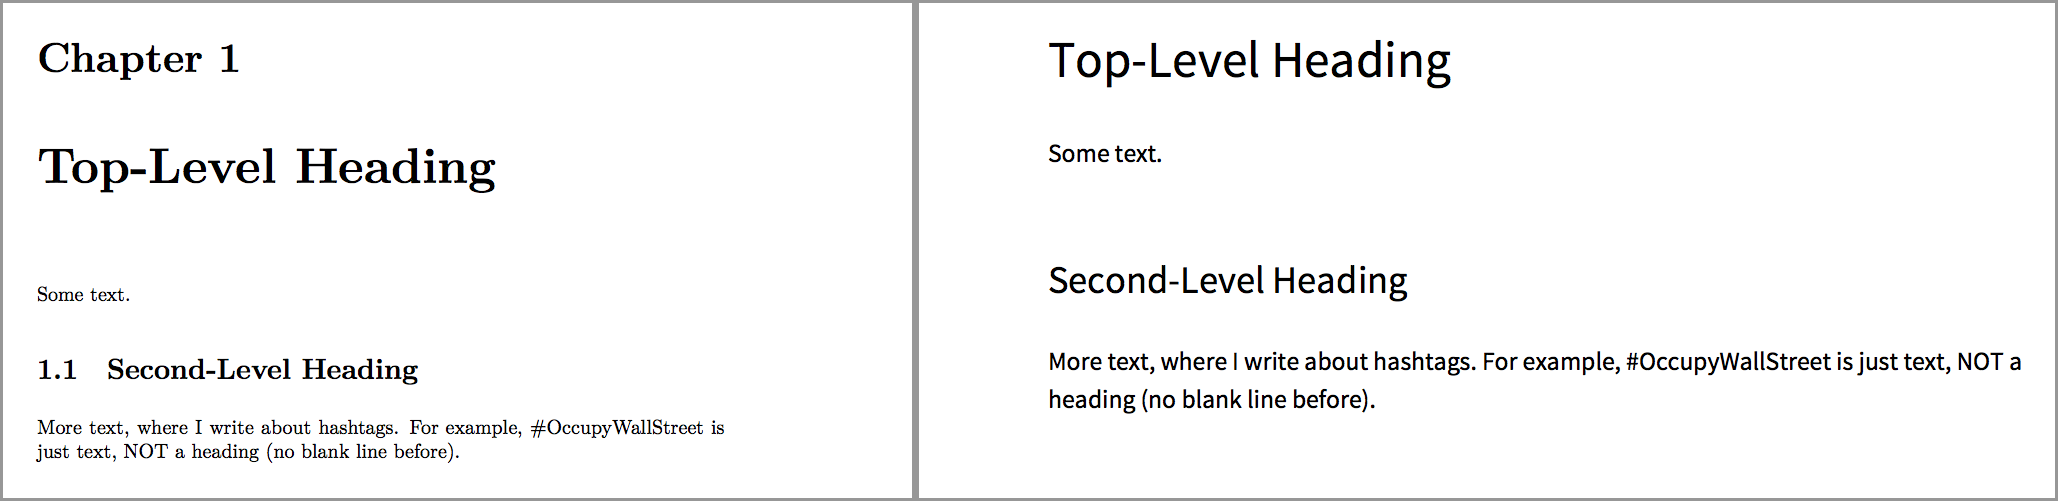
3.2.2.3 Unordered List
Bullet-point lists are one or more lines starting with a - (minus) character
Simple:
    A list:

    - lists
    - some
    - things
With sub-elements (see ‘nesting elements’):
    A nested list:

    - first item
    - this item
        - has subitems
        - which are intended
        - with 4 spaces
    - last item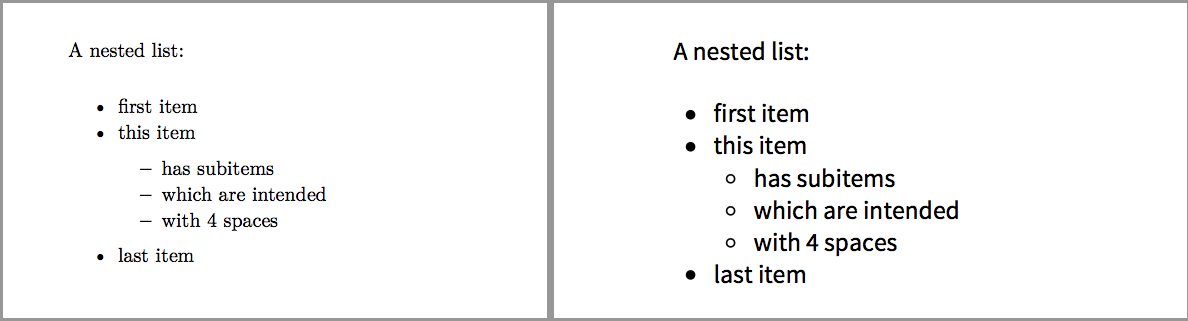
3.2.2.4 Ordered List
When the order of the items in the list matters, they can be numbered.
Ordered lists are one or more lines starting with a number and a . (period) character
    A numbered list:

    1. lists
    2. some
    3. things
3.2.2.5 Figure
A line of text with only an ‘image’ (see above) is interpreted as a ‘figure’. This means it will be a separate, centered, document element. More importantly, the image description is used as the ‘caption’. In print, they will also be numbered chronologically throughout the document.
Note: To insert a separate picture, without turning it into a figure, for example when including a logo, insert a ‘invisible whitespace’ before it, like this (see ‘escaping’):
\ 3.2.2.6 Blockquote
For larger citations, start each line with a > (greater-then) character, just like in an email:
One of my favorite quotes:

> "Most quotes you find on the internet
> are wrongly attributed."
>
> — *Oscar Wilde*
3.2.2.7 Code Block
Like the ‘verbatim’ text formatting, but in a block.
There are two ways to achieve this:
- Indent every line by 4 spaces:
        Some `BASIC` code:

            10 PRINT "Hello World"
            20 GOTO 10

More text.- Or put a “fence” of (at least) 3 backticks around it. With this syntax, a language can optionally be specified (for syntax highlighting), by writing it after the opening line of backticks:
    Some `JavaScript` code:

    ```js
    var form = function (content) {
      follow(content);
    };
    ```

    More text.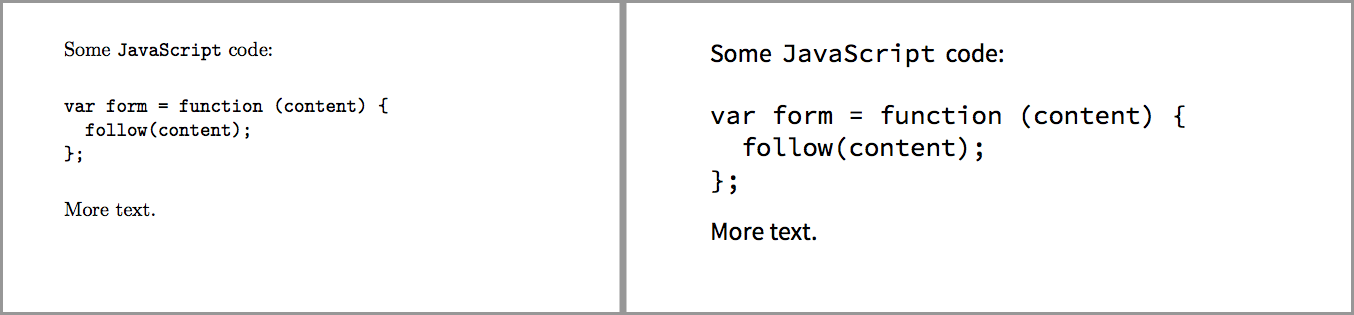
3.2.3 Nesting Elements
Block elements can contain other block elements.
Each nested element has to be indented by 4 more spaces than the parent block.
A nested list:

- A paragraph in a list.

    Another paragraph belonging to the first item.

- Another paragraph.

    - The second list item
    - contains itself

        > "A blockquote inside the second list."

    - another list

- Last paragraph.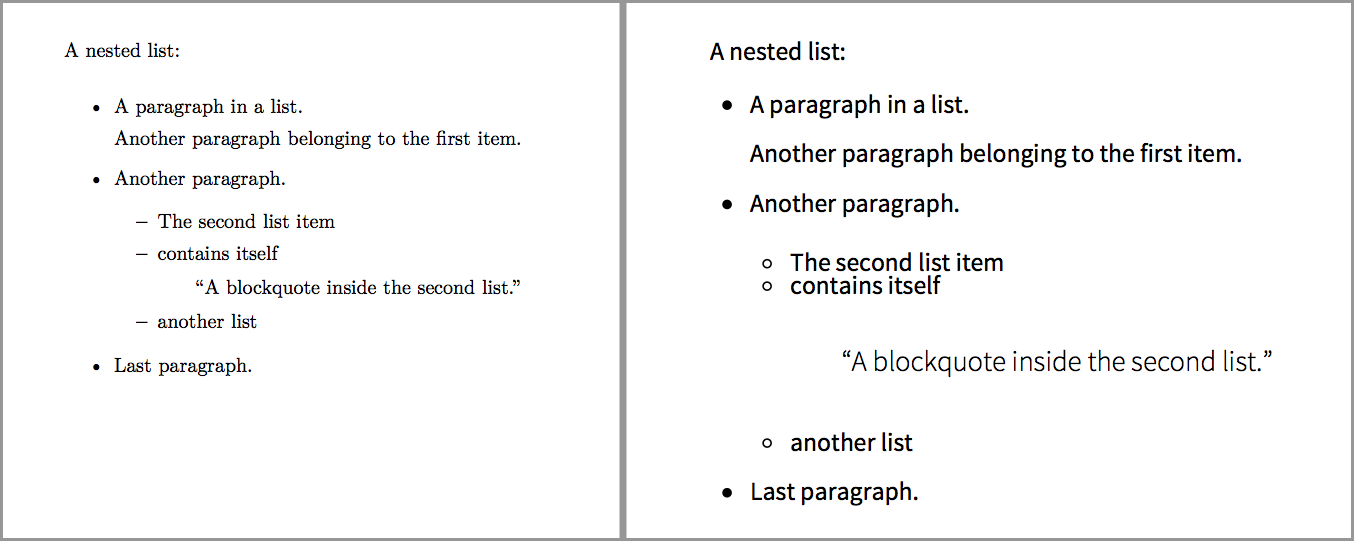
3.2.4 Special Elements
3.2.4.1 Links
A link consists of two units: a target and an anchor. The target is the link’s destination and the anchor which is the part of the document that ‘links’ to the target.
In a web browser, a user clicks the anchor to navigate to the target.
3.2.4.1.1 Plain
The most simple link is just the target in <> (pointy bracket) characters.
A full link to <http://example.com>.3.2.4.1.2 Inline
The anchor is put into [] (square bracket) characters, followed directly by the target, enclosed in () (parentheses) characters, like this: [anchor](target)
Some text [linking somewhere else](http://example.com).3.2.4.1.3 Reference-style
For a more readable source, the target can also be put separately. The anchor still needs to be put in square brackets and be repeated later, followed by an : (colon) and the link. A different name can be given to an anchor by writing directly after it, also in square brackets:
A sentence with [lots] of [links] would [become unreadable][ugly] quickly.

[lots]: http://example.com
[links]: http://example.com/link
[ugly]: http://example.com/ugly
3.2.4.1.4 Internal Links
All ‘headings’ are automatically recognized as targets, so a reference-style link can be constructed without declaring them outside of the heading themselves (if the heading is to long, an ID can also be declared manually, see ‘Attributes’).
## Section on Semantics

Some Text, referring to [the other section][more].

## Another Section {#more}

For more information, see the [Section on Semantics].
3.2.4.2 Image
Images can be inserted anywhere in the text. The syntax for images is the same as links, but with a ! (exclamation mark) character preceding the anchor. Also see: figure.
- Text inside the anchor is used as the image description
- He target denotes the path to the image
- Images can have the following formats: ‘JPG’, ‘GIF, ’PNG’
- The description will only be visible if the image is a figure
Careful: The image files need to be inside the project folder, see the section on ‘Assets’ for more information.
Text with image  inside.or
Text with image ![Another Image][picture-id] inside.

[picture-id]: /path/to/image.jpg
3.2.4.3 Footnote
Footnotes almost look like reference-style ‘links’, but the anchor has to start with a ^ (caret) character.
This is some text.[^footnote] And more text.[^another-fn]

[^footnote]: With a footnote.
[^another-fn]: And another footnote.
3.2.4.4 Citation
The syntax for citations is also quite simple: just an identifier for the cited item, preceded by an @ (at-sign) character.
A list of references will be automatically inserted at the end of a document, but you have to include a ‘heading’ yourself, as shown in the example.
However, a ‘database’ of all your literature is needed to find the item referred to by the identifier. Moreover the desired ‘style’ for the citations differs between publications. For more information, see the the section on Assets.
Some text [see @a:book, p. 1-5; also @b:article, ch. 1].

## References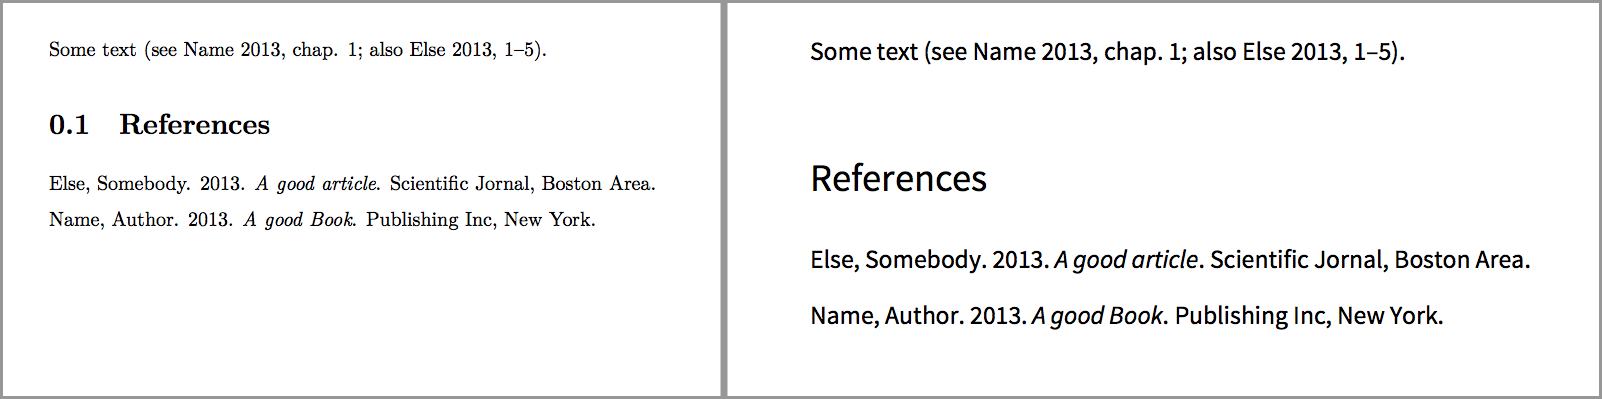
3.2.5 Comment
Comments can be written in the HTML syntax by enclosing text between <!-- and -->.
They are not visible in any output format and can be used anywhere in the document.
<!-- A comment. It will NEVER be printed. -->

The weather was <!-- not --> good.

<!--
this complete
paragraph is
ignored!
-->
3.2.6 Escaping
Although the punctuation characters used in the Markdown syntax are carefully chosen to not have unintended side effects, it still can happen sometimes.
The solution in those cases is to use a technique called ‘escaping’. By putting a \ (backslash) in front of any character, it will NOT be interpreted as Markdown.
(We have already seen an example of this in the paragraph section: Ending a line with a backslash does actually ‘escape’ the linebreak!)
Example: How to write words with *stars* but no emphasis?
Solution: How to write words with \*stars\* but no emphasis?
3.2.7 Attributes
ADVANCED TOPIC!
If you don’t understand this, don’t worry – you’ll probably don’t need it.
Attributes (meta-data) can be added to heading and code block elements. These are useful when customizing the project, especially when working with the HTML output. In the simplest form, they can be used to style these elements visually, but the possibilities are endless.
Attributes are written inside {} (curly braces) at the end of the elements’ first line.
- ID
set the
idof an element.
Headers always have anid, if it is not defined it will be auto-generated.# Heading {#my-id}results in the following
HTML:<h1 id="my-id">Heading</h1>- class
add a class to an element
# Heading {.my-class}results in the following
HTML:<h1 id="heading" class="my-class">Heading</h1>- general attribute
with an optional value
# Heading {my-attribute=value}results in the following
HTML:<h1 id="heading" my-attribute="value">Heading</h1>
3.3 Assets
Assets are all files that are needed to output a publication other than the text source.
In order to keep a project ‘portable’, all assets need to reside inside the project folder, otherwise it might only be compiled on the computer it was created. For the same reason, all assets need to be declared using a relative path. (See Images for an example).
If version control is used, this also ensures that all assets are tracked and all collaborators have access to them.
Note: Because the assets may also be created using software, they could have a ‘source’ themselves: An image created in Photoshop would have a source ‘.psd’ file and a resulting ‘.jpg’ image.
As mentioned in the git section, generated content should not be committed. How this applies to generated assets as well depends on the context of the project. In any case only the sources or the results should be tracked.
If the assets are fairly static, or are the responsibility of either a single collaborator or someone outside the project, the results can be committed.
If the production of the assets should happen collaboratively, their sources should be committed. This requires that all collaborators have access to the software producing the results, which could be a problem when using commercial software. Also, a mechanism must be in place so that the assets are re-generated every time the sources change.
In more complex cases, a separate repository for handling the assets could be created and the generated assets published elsewhere.
3.3.1 Images
Images need to be linked with a ‘path’ relative to the document!
That means it should not start with a full path, like C:\, /Users/foo/ or /home/foo/.
Two dots (..) in a path mean ‘go up one directory’.
Example: The relative path from the document to the image is ‘../figures/image.jpg’
    Project/
    ├── figures/
    │   └── image.jpg
    ├── Text/
    │   ├── document.md
    (...)
Supported Formats:
JPG,GIF,PNG
There are 2 additional vector formats only supported by either print or web targets:
PDFcan be used in printSVGcan be used in web
If print and web outputs should be created from the same source, the .pdf or .svg extension has to be omitted from the ‘path’, like this: ‘../figures/image’ and both versions must exist next to each other.
    (...)
    ├── figures/
    │   ├── image.pdf
    │   ├── image.svg
    (...)
If the creation of SVG images is not possible, it is recommended to use (non-vector) PNG, together with the following configuration:
"web": {
  "defaultImageExtension": "png"
}
3.3.2 Bibliography
References to external sources, like books and articles are a requirement for many types of publications.
As shown in the Markdown section, there is an easy syntax to insert a reference anywhere in the text, using only an identifier and an optional location, like so: See [@id, pp. 23-42].
However, for this to work a database, storing the actual meta-data pertaining to the identifier must exist, and be configured ("bibliography": "foo.bib").
The recommended database is BibTeX format, also commonly used in TeX.
Because it is already widely used, there are diverse (GUI) programs available for all operating systems helping to maintain a BibTeX file.
If you are already using software to manage and organize your resources, support for BibTeX might already be built-in (for example Mendeley).
The format has many idiosyncrasies, most of which are unfortunately shared by the GUIs. They are beyond the scope of this manual, but the example used in it can serve as starting point. It shows how to store the most commonly used types of media, including how cross-reference them (e.g. an article in a book). Moreover, since the BibTeX format is widely ambiguous, it shows a subset which does reliably work.4
Example: A BibTeX file with a book; an article inside that book (‘incollection’, note the ‘Crossref’); an ‘electronic’ resource; and a ‘misc’ (miscellaneous) item to be used for anything else (like unpublished works).
@book{benjamin:street,
  Author = {Walter Benjamin},
  Publisher = {Penguin UK},
  Title = {One-Way Street and Other Writings},
  Year = {2009}}

@incollection{benjamin:teaching,
  Crossref = {benjamin:street},
  Title = {TEACHING AIDS},
  Year = {1928}}

@electronic{ziemann:formalia,
  Author = {Andreas Ziemann},
  Title = {Eine kleine Einf{\"u}hrung in
    wissenschaftliches Arbeiten},
  Url = {http://www.uni-weimar.de/medien/soziologie/
    lehre/Wissenschaftliches_Arbeiten.pdf},
  Urldate = {2013-08-07}}

@misc{Nietzsche:schreibzeug,
  Author = {Friedrich Nietzsche},
  Howpublished = {KSB 6, Nr. 202},
  Month = {02},
  Title = {Letter to Heinrich K{\"o}selitz},
  Year = {1882}}
3.3.2.1 Citation Style
When a resource is cited with the correct syntax, and the identifier is found in the database, the reference will appear in the output according to the citation style.
Generally, citation styles differ between institutions, and there are many variations.
The most common distinctions are listing the references in numerical order, or by author and date (‘Harvard’ or ‘Chicago’ style). The latter is the default (when no style is explicitly configured).
Luckily there is yet another established standard: The Citation Style Language, defining them in a machine-readable way. There are currently over 6000 styles in the official collection, though less than a thousand of them are unique, or ‘independent’ styles. The rest of them are almost-empty ‘dependent’ definitions of specific journals, declaring which of the ‘independent’ styles they use.
Search and Download a style which suits your context (or is required by your institution)
There is also a style browser and editor by Mendeley (Beta Version)
- The standards:
- numeric
- IEEEE (used in this document)
- DIN 1505-2
- author/date
- numeric
4 Output
4.1 Print
The ‘print’ output produces a PDF file suitable for printing, using (Xe)TeX.
4.1.1 Styling
Apart from the class, the following ways to style your print output are supported. These are also the settings used for this publication:
"print": {
  "class": "book",
  "mainfont": "Source Sans Pro",
  "monofont": "Source Code Pro",
  "fontsize": "11pt"
  "geometry": "a4paper, centering, bindingoffset=15mm",
}
4.1.1.1 Document Classes
These are the 3 most common document classes used in (La)TeX:
- Article
- Report
- Book
An article is the most condensed output template. There is just a title block, followed by the content (including the optional table of contents).
The report is the default class in papermill. It leaves more whitespace, reserving at least one full page for the title block, the table of contents, and part/chapter blocks each. Output from this class is also suitable for reading on a screen, in case the ‘web’ version is not an option.
The book class is like the report, but optimized for two-folded binding. It also repeats the name of the current chapter on the top of each page to help the reader navigate large documents.
4.1.1.2 Font
Using the ‘*font’ properties, you can select the exact name of any TTF or OpenType font installed on your computer.
mainfont: main body textmonofont: verbatim formatting, code blocksmathfont: Math (formulas, symbols)
The ‘fontsize’ can be either 10pt, 11pt or 12pt.
4.1.1.3 Geometry
The available options for the ‘geometry’ setting can be found in the corresponding package documentation. They can be used together if the are separated by a colon and a space, as in the example above. The most useful ones include:
- Paper sizes:
a4paperora5paperortotal={22.6cm, 32cm} - Margins:
centeringormarginratio=1:1ormargin=2cmortop=2cm, left=2.5cm, right=3cm - Binding offset:
bindingoffset=15mm
4.1.2 Layout Adjustments
The TeX systems are extremely powerful typesetting engines, but nevertheless limited by the fact that they are software.
While the program is aware of common typographical errors, in absence of a human it has to rely on an internal system based on ‘penalty points’ for the decision making, thus can not always be right.
The position of page breaks and other layout/whitespace problems are among the most common issues. They can be solved quite easily by taking advantage of the fact that plain (La)TeX commands are allowed in the document source.
These commands only affect the print output, so while it does make the source less media-agnostic, it does not cause any further problems.
4.1.2.1 Page Break
To force a pagebreak anywhere in the printed document, enter the following two lines:
\vfill
\pagebreak
The \pagebreak command’s function seems self-evident, but it does not have the same effect as one would expected from a word processor: A page break is inserted, but the content on the page right before it will be ‘stretched’ across the page via a (sometimes very) increased line-height.
Conveniently, the \vfill command right before it ‘fills’ the vertical space before the \pagebreak, so that the two commands together work as expected.
4.2 Extras
4.2.1 Additional Designs
The font used in the default TeX template is called Computer Modern, also available in TTF format. Useful in cases where additional elements need to be designed and the same font is desired. (Example: Title page for a letter-pressed cover)
4.3 Web
Output for the ‘web’ is produced in HTML format, styled with the bookstrap template.
4.4 bookstrap
Source code and further information: http://github.com/papermill/bookstrap
- Based on ‘Bootstrap 3’
- Build modern web browsers
- Adheres to web standards
- uses
lesscss- small components
- configurable
- extendable
- Focus on readability
- Grid based on typographical em-units — adheres to layout and line length regardless of zooming
4.5 Styling
Styling the web output is possible by using CSS. The generated markup has a semantic structure and allows easy styling.
Additional attributes can be also added to elements in order to style them, see ‘Attributes’ in the Markdown section.
Finally, the generated markup can also be customized with templates.
If CSS is new to you, use Mozilla’s documentation as a starting point:https://developer.mozilla.org/CSS
4.6 Publishing
The resulting HTML can be uploaded to any web host, but is optimized to be shared via any other digital medium:
All ‘assets’ (images, styles, fonts, etc) will be ‘embedded’ into the HTML file.
This means that it can be sent via USB drives, email, uploaded to a blog, content management system or file sharing service without ‘breaking’ them because of missing assets. Otherwise, some files may not be copied along, or may not available due to the nature of the medium.
This can be turned off in the configuration by setting "selfContained": false and should be done if publishing to a regular web server is planned, where links to the assets are known to work. Especially if fonts, styles or images are shared between multiple documents published to the same web host, the selfContained feature would cause needless re-downloading of files that could otherwise be in the browser’s cache.
Lastly, publishing a PDF file to the web is also an option, but it should be noted that the default settings in papermill are optimized for print purposes. For example, links are represented as footnotes and there are no colors present other than black (except in images or syntax-highlighted code). This be adjusted in the project configuration if desired.
5 mill
mill is a Command Line Utility written in JavaScript using node.js.
It contains a parser (a module that can read and understand the configuration) as well as an compiler (a module that outputs the document(s) according to their configuration) — of course using pandoc.
For installation instructions and more information, see the current version of the README.
5.1 papermill.json
5.1.1 Input
An ‘input’ is at least a path to at least one document.
It can be just the path as a string:
"input": "document.md"It can also be an object with more configuration:
    "input": {
      "title": "My Document",
      "path": "document.md"
    }
This object may also contain a ‘list’ of documents, which will be treated as sub-folders of the parent path:
    "input": {
      "path": "Texts",
      "list": {
        "First-Text.md", // => 'Texts/First-Text.md'
        "Other-Text.md"
      }
    }
5.1.2 Output
The ‘output’ defines how the ‘input’ documents will be converted (‘compiled’) to a target (a format suitable for reading).
Again, a path needs to be given, but in this case it denotes a folder inside the project were the output files will be placed.
"output": "_output"There are two default targets: ‘print’ and ‘web’. They come with their own built-in settings, and can also be further configured. For example, the ‘print’ option is configured to convert any links into footnotes, while they are untouched in the ‘web’ target.
These are the default values used when nothing is configured:
    "output": {
      "path": "_output",
      "web": true,
      "print": true
    }
That means that if one of the default targets is not wanted, it can be turned off by setting it to ‘false’. Moreover, any additional settings for one of those targets can be given in an object:
    "output": {
      "path": "_output",
      "web": false,
      "print": {
        "mysetting": true
      }
    }
Because the document conversion is handled by pandoc, all its settings are supported (written a bit different, --some-setting becomes someSetting).
These are the most important settings (for a complete list, see pandoc’s User Guide):
5.1.2.1 General Options
bibliographypath to bibliography file
cslpath to citation style
selfContainedinclude all assets in file (web only)
5.1.2.2 Visual/Layout Options
tocenable a ‘Table of Contents’
smartsmart typography (
"foo"=> “foo”)
normalizenormalize the whitespace
noHighlightdisable code syntax highlighting
highlightStyleset syntax highlighting style
chaptersmake chapters from top-level headings (print only)
numberSections“Number section headings” (print only)
5.1.2.3 Content Options
strictjust use the original Markdown
read- Choose a Markdown flavor
markdown:pandoc’s Markdownmarkdown_strict: original Markdownmarkdown_github: GFM (GitHub flavored Markdown)markdown_phpextra: original Markdown
- Or build your own flavor: choose one as a base and enable or disable
pandocextension by adding them with a+or-sign{markdown_flavor}+{extension}-{extension}- e.g.:
markdown_github+footnotesfor GFM with footnotes
- Or define any other input format supported by
pandoc(HTML, LaTeX, restructuredText, textile, MediaWiki,…)
- Choose a Markdown flavor
5.1.2.4 Customizing Output
templateuse a custom
pandoctemplate(!)cssuse a custom style sheet (web only)
includeInHeader,includeBeforeBody,includeAfterBodyinclude other files (untouched) before conversion
writeany output format supported by
pandocvariableset template variables
authortitledatelangclass(=documentclass)mainfont,sansfont,monofont,mathfontlinkcolorurlcolorlinks-as-notes
5.1.3 Defaults
For reference, these are the complete default settings, general and for both targets:
    {
      "path": "_output",

      "read": "markdown",
      "standalone": true,
      "selfContained": true,
      "smart": true,
      "toc": true,
      "normalize": true,
      "numberSections": true,

      "web": {
        "write": "html5",
        "sectionDivs": true,
        "variable": {
          "webfont": true,
          "scripts": true
        }
      },

      "print": {
        "class": "report",
        "latexEngine": "xelatex",
        "variable": {
          "links-as-notes": true,
          "verbatim-in-note": true
        }
      }
    }
6 Get involved
As this manual shows, the papermill project is merely starting to be a complete solution for ‘machine writers’.
If you like (parts of) this document and want the papermill to go on, you, the reader have to get involved. As with any open source project, there is a wide range of possible involvement, starting from just , to structured feedback in the form of bug reports and feature requests, writing and fixing documentation, design and software. Most of this can even happen from the comfort of your web browser.
6.1 Learning Resources
(listed in ascending order of expected experience)
- “Eloquent JavaScript” by Marijn Haverbeke [9]
- “JavaScript Pocket Reference” [10]
- “The Node Beginner Book” [11]
- “The Idiomatic JS Styleguide” [12]
- “JavaScript: The Good Parts” by Douglas Crockford [3]
- “Hands-on Node.js” [13]
- “Node: Up and Running” [14]
7 Appendix
7.1 License
This publication is ‘free and open source’, licensed under the MIT license:
Copyright (c) 2013 Max F. Albrecht
Permission is hereby granted, free of charge, to any person obtaining a copy of this software and associated documentation files (the “Software”), to deal in the Software without restriction, including without limitation the rights to use, copy, modify, merge, publish, distribute, sublicense, and/or sell copies of the Software, and to permit persons to whom the Software is furnished to do so, subject to the following conditions:
The above copyright notice and this permission notice shall be included in all copies or substantial portions of the Software.
7.2 References
[1]F. Nietzsche, “Letter to Heinrich Köselitz.” KSB 6, Nr. 202, Feb-1882.
[2]M. Stingelin, “‘UNSER SCHREIBZEUG ARBEITET MIT AN UNSEREN GEDANKEN,’” in Schreiben als Kulturtechnik. Grundlagentexte, S. Zanetti, Ed. Suhrkamp-Taschenbuch Wissenschaft, 2012.
[3]D. Crockford, JavaScript: The Good Parts. O’Reilly Media, Sebastopol (CA), 2008.
[4]A. Ziemann, “Eine kleine Einführung in wissenschaftliches Arbeiten,” 2009. [Online]. Available: http://www.uni-weimar.de/medien/soziologie/lehre/Wissenschaftliches_Arbeiten.pdf. [Accessed: 07-Aug-2013]
[5]Wikibooks, “LaTeX: Document Structure.” [Online]. Available: http://en.wikibooks.org/wiki/LaTeX/Document_Structure. [Accessed: 08-Aug-2013]
[6]W. Benjamin, “TEACHING AIDS (1928),” in Walter Benjamin One-Way Street and Other Writings, Penguin UK, 2009.
[7]J. Gruber, “Markdown: Basics.” [Online]. Available: http://daringfireball.net/projects/markdown/basics. [Accessed: 02-Aug-2013]
[8]J. MacFarlane, “Pandoc User’s Guide.” [Online]. Available: http://johnmacfarlane.net/pandoc/README.html. [Accessed: 20-Oct-2007]
[9]M. Haverbeke, Eloquent JavaScript. A Modern Introduction to Programming. No Starch Press, 2011 [Online]. Available: http://eloquentjavascript.net
[10]D. Flanagan, JavaScript Pocket Reference, 3rd ed. O’Reilly Media, Sebastopol (CA), 2012.
[11]M. Kiessling, The Node Beginner Book. A comprehensive Node.js tutorial. Leanpub.com, 2012.
[12]R. Waldron and others, “Idiomatic.js. Principles of Writing Consistent, Idiomatic JavaScript.” [Online]. Available: https://github.com/rwldrn/idiomatic.js. [Accessed: 18-Jul-2013]
[13]P. Teixeira, Hands-on Node.js. Leanpub.com, 2012.
[14]T. Hughes-Croucher and M. Wilson, Node: Up and Running. O’Reilly Media, Sebastopol (CA), 2012.
English: “YOU ARE RIGHT - OUR WRITING TOOLS COLLABORATE ON OUR THOUGHTS”.↩
And encoded in ‘UTF-8’, also known as ‘Unicode’.↩
See Semantic Writing chapter in the Introduction.↩
E.g. there is the media type ‘electronic’, ‘URL’ and ‘webpage’, which could be used for web sites as sources, but only ‘electronic’ does work with all flavors of
TeX↩